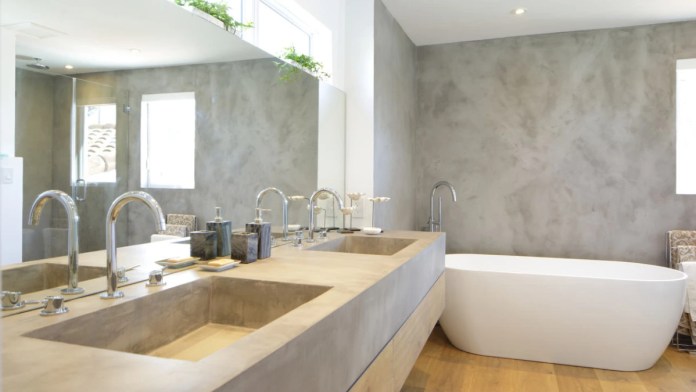
Microcement is a thin surface coating that is applied to produce a sleek, contemporary finish on walls, floors, worktops, and even furniture. Formulated from a combination of cement, resins, pigments, and other additives, it’s applied by hand in thin coats—typically 2–3 millimetres thick. After sealing, it becomes durable, water-resistant, and easy to maintain.
It’s a favorite with homeowners, builders, and designers for one good reason—it achieves the look of polished concrete without the complication or heaviness. You don’t have to excavate floors or pour tons of concrete. Microcement simply goes right on top of existing surfaces such as tiles, screed, plaster, or even timber, which reduces mess and expense.
It can be used in both contemporary and conventional environments, and it comes in a broad palette of colors and finishes. From a matte industrial appearance to a warmer natural color to something with more texture, it’s all achieved with microcement.
Where Can You Use Microcement
One of the greatest strengths of microcement is how versatile it is. It can be applied just about anywhere—kitchens, bathrooms, corridors, and even outside in patios or garden walls. It sticks to horizontal and vertical surfaces, so you can produce smooth flows with no joins or grout lines.
In kitchens, it’s commonly applied to splashbacks, worktops, and flooring. Since it’s waterproof when sealed, it’s also perfect for wet rooms and showers. You have a smooth, unbroken surface with no cracks for mould or dirt to form in.
Other individuals also use it to update old staircases, fireplace surrounds, or built-in shelving. It’s a good choice if you desire a contemporary look without having to tear everything out. You can even use it over existing concrete or stone for a high-end finish that feels smoother and warmer underfoot.
It’s not only for houses, either. Most shops, cafes, and salons employ microcement for its clean finish and low-maintenance upkeep. It provides a professional finish without appearing done too much.
What Does the Process Entail?
Applying microcement is a skilled job and not something you’d normally tackle as a DIY project. The surface needs to be properly prepared, primed, and level before any cement is applied. Then the microcement is built up in multiple coats, each one applied by hand using a trowel.
Once the last coat, a protective sealant is applied to shield the surface from water, stains, and wear. This could be a matte, satin, or gloss finish depending on the product and the room. The entire procedure takes several days, mostly due to the time required for each coating layer to dry and harden.
Because of the thinness of the product, it does not contribute much to the height of your floors or walls, which is handy in areas where there is little clearance. It’s also less heavy than concrete, so it places less stress on the frame of your house.
Things to Think About Before Choosing Microcement
Although microcement is durable and long-lasting, it does require careful attention to keep it looking its best. It scratches if pulled across with hard or abrasive items, and it’s not heat-resistant, so hot pans shouldn’t be left straight onto kitchen worktops. In the same way as wood flooring or natural stone, it prefers mild cleaning products and the occasional resealing, depending on its usage.
Cost can also vary. It’s usually more expensive than tiles or laminate but cheaper than pouring polished concrete. You’re paying for the finish and the skill of the installer. Done properly, though, it lasts for years and can give your home a more refined, modern look without a full renovation.
Also Read: Microdosing Mushrooms: What Kind of Mushrooms Are These?


